
PractiTest: Test Management Simplified
Organizations rely on their software testing division to help build and deliver reliable, high quality product. Effective test management is needed to achieve the organization’s goal of delivering high quality products that meet customer needs. The tasks associated with the test management process can be simplified with the help of test management tools. There are many test management tools available in the market. PractiTest is one such tool whose “Hierarchical Filter tree” feature makes it unique.
PractiTest is a test management tool designed to simplify the test management process. This test management solution can be used to effectively manage the testing activities in a project and to communicate the test results to everyone in the organization. PractiTest can have 2 way integrations with bug tracking tools such as JIRA, RedMine, Bugzilla, Fogbugz, etc. The system can also integrate with Selenium, QTP, SoapUI, Jenkins, and more. PractiTest provide different modules for managing the test process and these modules are interconnected to provide an end to end visibility into the life cycle of the project.
Managing the Test Process
PractiTest provides the following modules for managing the testing activities in a project:
- Requirements
- Test Library
- Test Sets & Runs
- Issues
- Dashboard
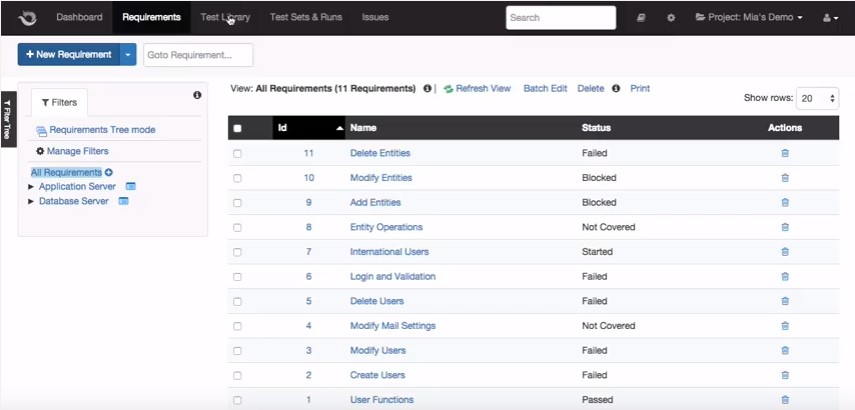
Requirements: Either we can create a requirement directly in PractiTest (using “New Requirement” option available in the Requirements module) or we can import requirements from Google worksheets or excel. As mentioned earlier, PractiTest can integrate with external systems like JIRA, Pivotal Tracker, etc. This integration makes it possible to present the requirements created in these external systems, in PractiTest. The requirements thus created can be linked to tests (in the Test Library) or issues (in the Issues module), and thus, traceability can be established among these entities.
The next 2 modules – Test Library and Test Sets & Runs are used for creating & managing test cases and grouping test cases into test sets.
Test Library: This is the module where we can create and store the test cases. These test cases can be later executed in the “Test Sets & Runs” module.
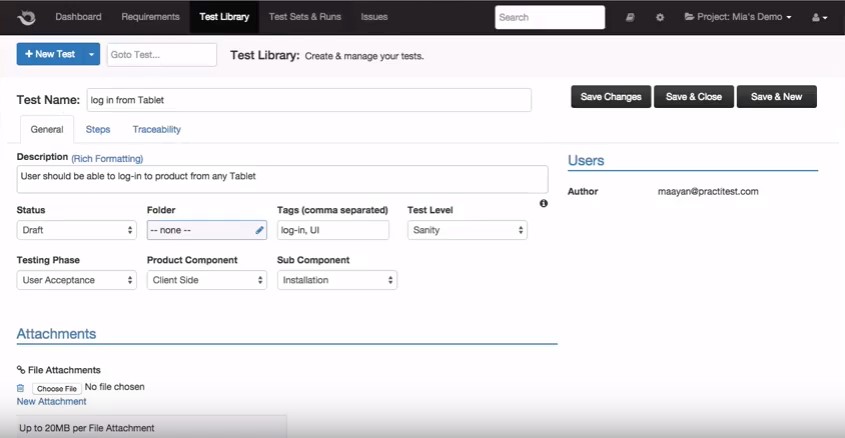
In the Test Library, we can create a test case by performing the following steps:
- Click the “New Test” button
- Give a Test Name and a small Description
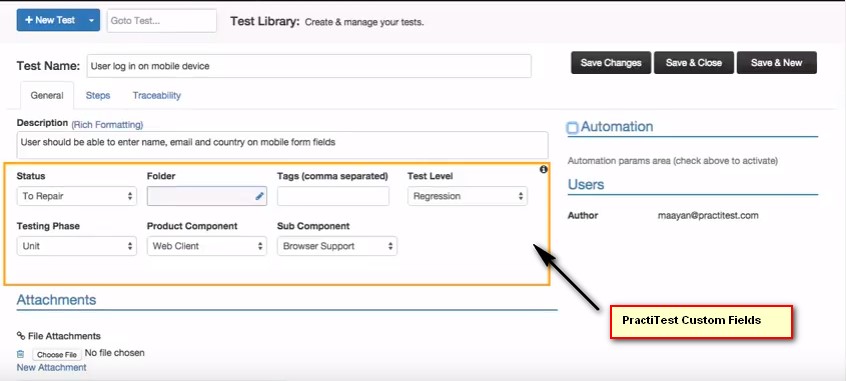
- Further information can be added using PractiTest custom fields
- Go to the next tab “Steps” and add the test steps
- Each step can have a name, description and expected results
- Attachments can be added using the “Add attachments” option provided
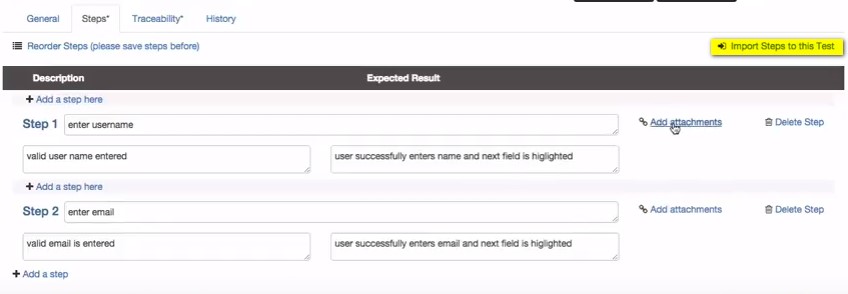
Rather than creating steps as shown above, we can import steps to the test from spreadsheets using the option – “Import Steps to this Test”.
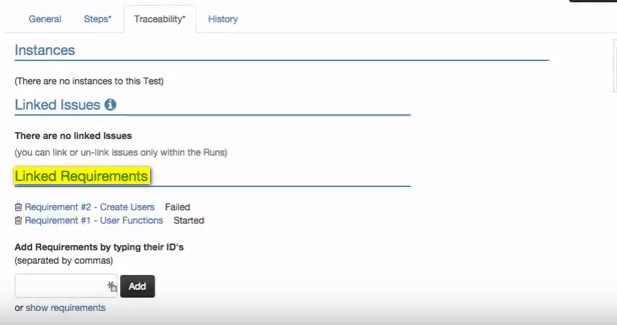
- Next, we can link this test to the existing requirements, in order to establish the traceability
- For that, go to the “Traceability” tab and add requirements (“Linked Requirements” section)
Now, we can run the test case.
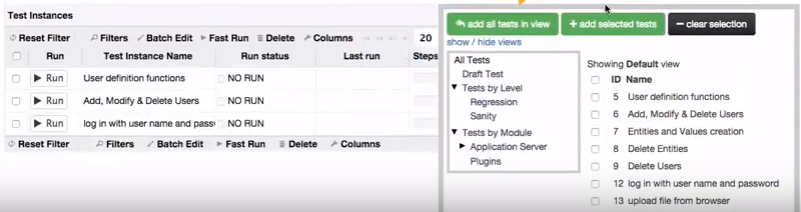
Test Sets & Runs: This is where we can group the test cases into test sets and run them. Test Sets are group of tests that can be run together. For example, a group of tests covering a particular feature, or a group of tests that is part of a regression suite or a group of tests that should be run in a particular sprint, etc.
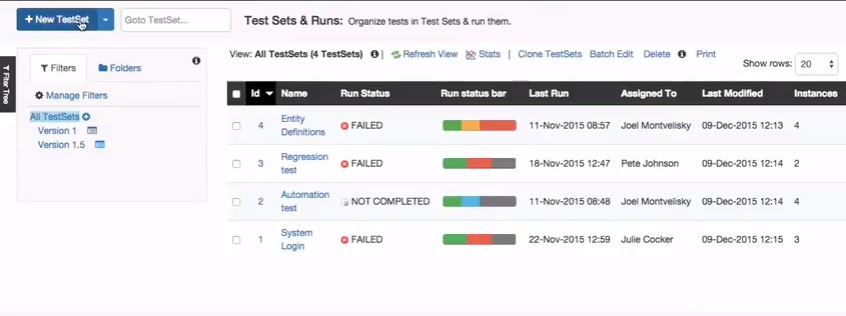
In the Test Sets & Runs module, we can create a test set and execute it by performing the following steps:
- Click the “New TestSet” button
- Give a name for the Test Set; further information can be provided using the custom fields
- Next, we can add test instances from the Test Library using the option – “Add Test to Test Set”
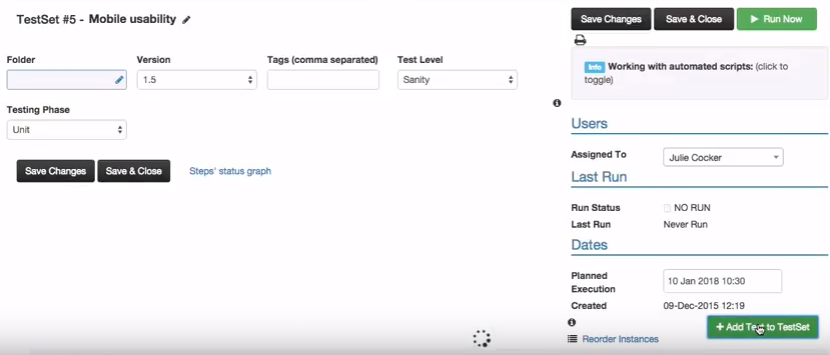
- To run the test, click the “Run” button against each test instance or just click the “Run Now” button at the top of the screen
- This will take us to the screen, where we get to see all the steps to run
- Now, we can start the test execution
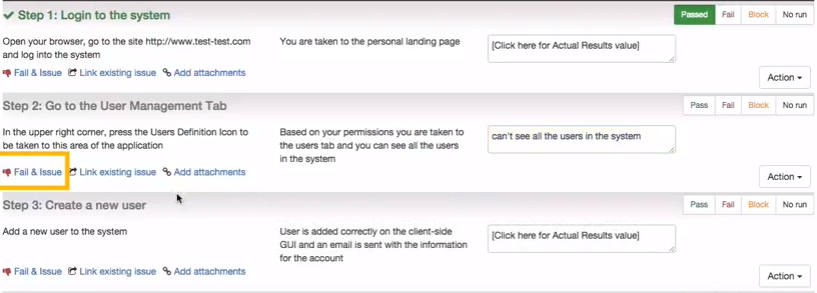
- For failed cases, we can report an issue directly from the run using the option – “Fail & Issue”
- Clicking on “Fail & Issue” link directly takes us to the Issue module of PractiTest, where the bug will be automatically generated based on the information from the test
- The issue title and Description will be auto populated (The issue title generated will be based on the name of the test we are running and description will have the steps to reproduce the issue, based on the steps we executed + the Actual Result we reported)
- Additional information can be provided using PractiTest custom fields
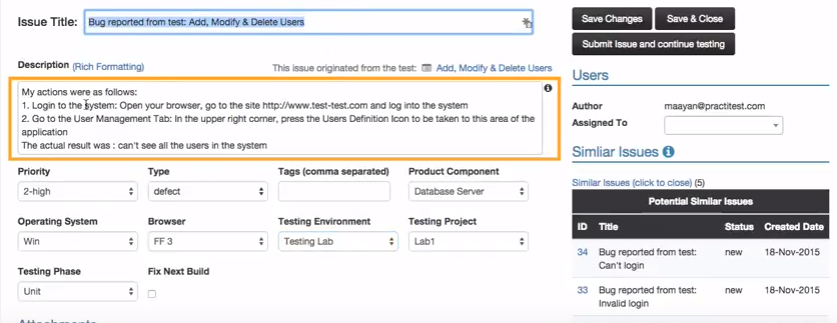
- After logging the issue, we can go back to continue the test execution using the option – “Submit issue and continue testing”
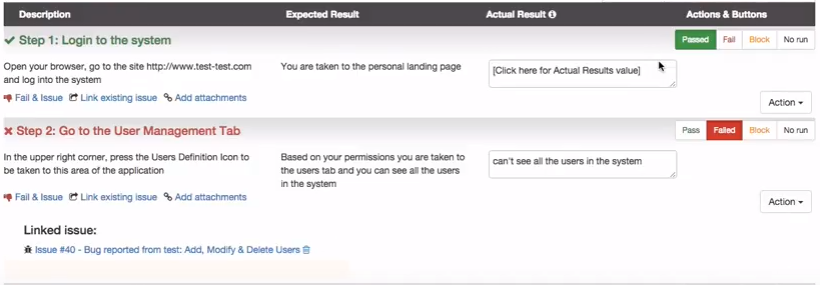
Here, we can see that the status of the test is set to Failed and the issue reported is linked to the test case.
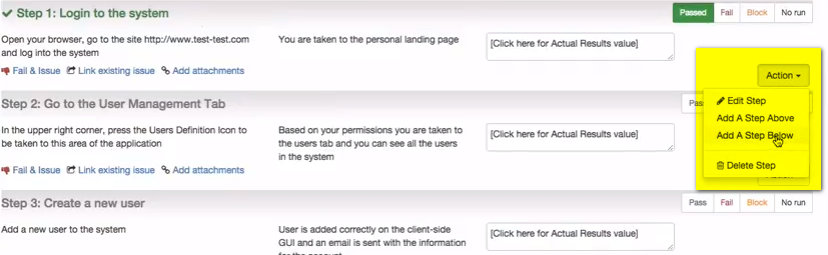
Test Steps can be manipulated during test execution. PractiTest provides an option called Step Actions, which can be used to update steps during a run.
Using these 2 modules – Test Library and Test Sets & Runs, we can run the tests multiple times throughout different releases or within the same release. Also, the status of the tests are updated throughout the modules because of the traceability. The status of the test run will be updated in the Test Sets, Test Library and Requirements module.
Issues: Here, we can create and manage issues. As mentioned before, we can report issues directly from test runs using the “Fail & Issue” link. This will take us to the Issues module, where the Issue title and Description fields will be automatically populated with the values captured from the test. PractiTest can be integrated with bug tracking tools like RedMine, Fogbugz, etc. If PractiTest is integrated with say, for example, RedMine, PractiTest opens RedMine in a new tab when user clicks the “Fail & Issue” link. Here, user can enter the bug details (the bug title and description will be auto populated) and create an issue. The issue created in RedMine will be linked to the test step in PractiTest. If we modify the issue in RedMine, it will get reflected in PractiTest and vice versa. Issues created in PractiTest as well as in other bug tracking tools (integrated with PractiTest) can be viewed and managed in the Issues module.
Dashboard: Using this module, we can communicate the results of our testing with everyone in the organization. Testing status can be displayed using dashboard graphics and reports.

The following sections provide a brief description about custom fields and hierarchical filters, the 2 important features in PractiTest , which plays a crucial role in organizing and managing the information within PractiTest.
Custom Fields
Custom field creation in PractiTest enables us to customize the testing to fit in the process followed by the organization. Custom Fields can be created in all the modules in PractiTest. i.e., all entities {Requirements, Tests, Test Sets, and Issues} can be customized to meet our project and process needs. We get 2 types of fields in PractiTest: System Fields and Custom Fields. System Fields are added by default for any project by PractiTest. System Fields can also be customized.
Creating a custom field in PractiTest
- To customize the fields, navigate to Settings — Fields tab.
- To create a new custom field, click the “Create New Custom Field” button.

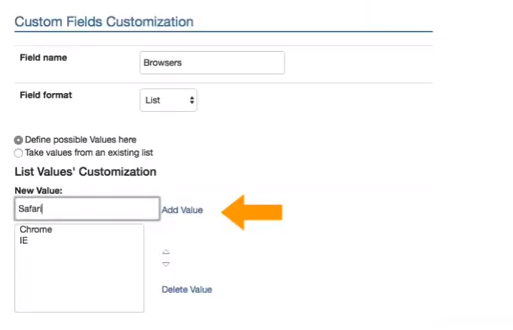
- Enter the field name, field type and the values as shown below
- Next, we can add this custom field in any of the entities as shown below. We can also set the field as mandatory.

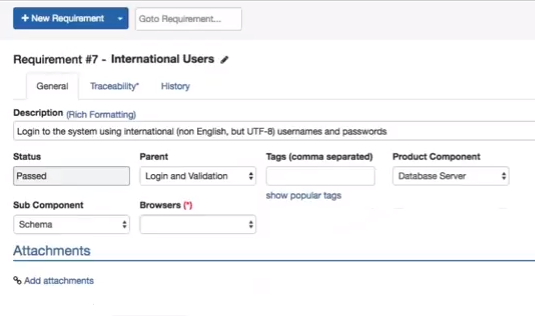
Now, if we open the Requirements module, we can see the custom field “Browsers”. Since we set it as a mandatory field in the “Requirements” module, a red asterisk will be shown next to the field, indicating that the field is a required one.
These custom fields can be used to create filters and dashboard graphs to organize the project information.
Hierarchical Filters
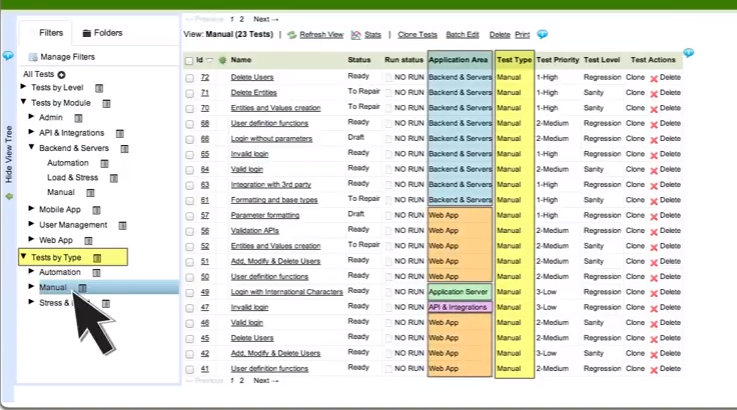
Information in all the modules can be organized using the hierarchical filters we can create in PractiTest. As an example, the information highlighted in the below screen can be used to create a filter. This will help us to manage our tests more effectively.
Filters are based on the fields that we use to customize the entities.
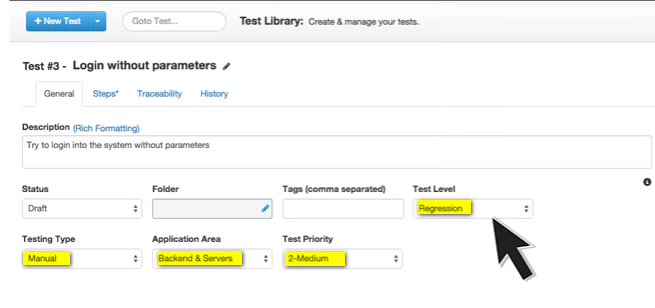
PractiTest provides a filter tree that will organize your tests by module, by level, by type etc. The below filter results shows all the tests of type “Manual” irrespective of the Application area.
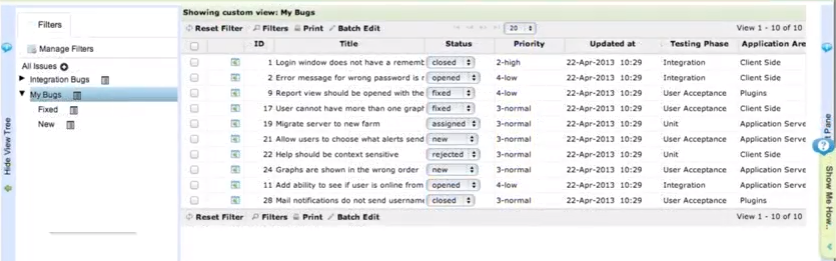
We can create filters in other modules too. For example, in the Issues module, we can create a filter to show the bugs assigned in our name.
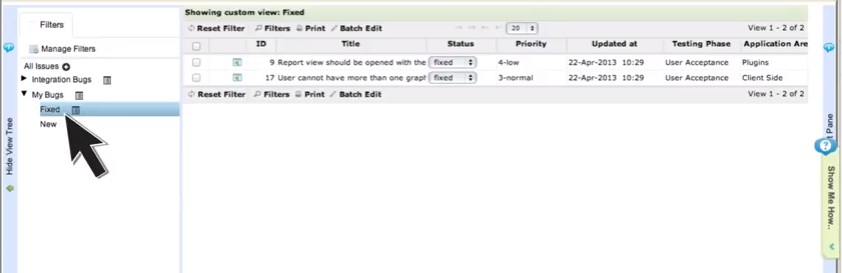
Now, if we want to see only those bugs which are in the fixed state, then we can create a sub filter and narrow down our filtering.
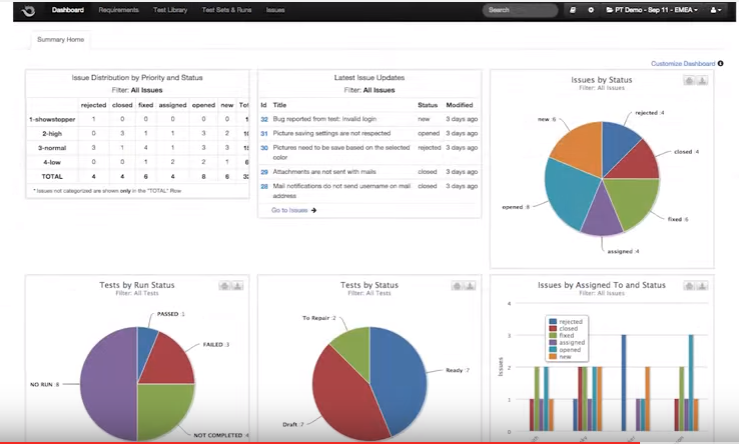
Filters can also be used to give insight into the current overall status using the Dashboard Graphs & reports like this:
Filter Creation and the usage are shown in the following videos:
PractiTest is a tool used for simplifying test management. It helps to
- organize epics, user stories, test cases, and testing tasks based on sprints, functionality, priorities and other aspects of your test process.
- integrate external tracking tools like JIRA or RedMine
- integrate automation tools and frameworks like Selenium, Jenkins, JUnit, etc.
- provide clear status updates of your project at any time to anyone within the organization.
References